

Baking a homemade king cake brings the joy and tradition of Mardi Gras right to your kitchen. While it’s called a "cake," king cake is actually a sweet, rich bread made from soft, brioche-like dough. This festive treat is filled with delicious flavors and captures the spirit of the season.
Originally created in Europe to celebrate the Feast of Epiphany on January 6th, the king cake made its way to New Orleans, where it became a beloved part of Mardi Gras. Typically filled with cinnamon, the cake is topped with vibrant purple, green, and gold icing. These colors represent the Mardi Gras themes of power, faith, and justice.
Traditionally, a small plastic baby is hidden inside the cake, and the person who finds it is said to have good luck. This person is often expected to host the next celebration or bring the king cake for the following year. It’s a fun tradition that adds excitement and a sense of community to the festivities.
Whether you stick to tradition or add your own twist, a homemade king cake is the perfect way to share the spirit of Mardi Gras. It’s a treat that brings people together, making it the centerpiece of any Mardi Gras gathering. With its rich history and festive flavors, it’s sure to create lasting memories for all who partake.
King Cake Ingredients
Ready to bake a traditional king cake for your Mardi Gras celebration? While it does take some time and care, the results are well worth the effort. You’ll need a few key ingredients, many of which you likely already have on hand. Here’s a breakdown of what you’ll need for the dough, filling, frosting, and decorations to create this festive and delicious treat.
All-Purpose Flour: For the base of your king cake dough, you’ll need Gold Medal™ All Purpose Flour, which provides the right structure and texture. It’s called "all-purpose" because it’s great for a wide variety of baked goods, from cakes to breads.
Fast-Acting Dry Yeast: Also known as instant yeast, this type of yeast helps dough rise faster than regular active dry yeast. The advantage of using instant yeast is that you can mix it directly with dry ingredients, unlike active dry yeast, which typically requires dissolving in warm water with sugar before being added to the rest of the ingredients.
Milk: We tested this recipe with 2% milk in both the dough and frosting, but 1% or whole will work as well. In the dough, milk helps create a softer crust and adds richness, while in the frosting, it thins and smooths the mixture for easy spreading.
Granulated Sugar: This helps sweeten the dough and activates the yeast. It also aids in browning the crust, giving it a golden finish and enhancing the overall flavor.
Salt: A little salt goes a long way. It enhances the flavor of the dough, strengthens the gluten, and helps the dough become more stretchable. It also ensures the dough holds its shape and rises just right.
Eggs: Large eggs add moisture, structure, color, and richness to the dough, helping it rise and giving it a soft, tender texture. They also ensure consistent results every time.
Butter: We like to use salted butter for the flavor and all the good things it does for the dough. If you only have unsalted butter on hand, go ahead and add a little extra salt to make up for it.
Brown Sugar: This type of sugar adds a rich, molasses-like sweetness to the filling and helps keep it moist. We used light brown sugar for a milder taste, but you can also use dark brown sugar for a stronger molasses flavor.
Ground Cinnamon: The spice brings warmth and a comforting, slightly spicy flavor that pairs well with brown sugar. For an extra touch, a pinch of nutmeg or ginger can add even more warmth and spice.
Corn Syrup: Corn syrup helps bind the filling together and adds a nice sheen. It also keeps the filling moist, preventing it from drying out as the cake bakes. We use light corn syrup, but you can also try dark corn syrup for a richer, caramel-like flavor and deeper color—just know the filling will have a slightly different taste and appearance.
Powdered Sugar: Also called confectioners’ sugar, powdered sugar is made by grinding granulated sugar into a fine powder, sometimes with a little cornstarch to keep it from clumping. We use it in the frosting for this recipe to create a smooth texture.
Vanilla: The extract adds a sweet, fragrant flavor that enhances the frosting. We like pure vanilla extract for the best flavor, but if you're out, it's fine to skip for the frosting. For an extra twist, you can add a touch of almond extract for a nutty flavor.
Miniature Plastic Baby: The mini plastic baby is a fun Mardi Gras tradition. If you don’t want to use the plastic baby, you can also slip in a dried bean, pecan half, or coin for the same surprise.
Decorating Sugars: These vibrant sugars are key to giving your king cake that festive touch. Green stands for faith, purple for justice, and gold for power, making each slice a celebration of Mardi Gras. The colorful sugars not only brighten up the cake but also add a sweet finish.
Cookware You’ll Need
Before we begin making your king cake, let's take a look at the essential tools you'll need. Some are kitchen basics, while others will help make the process smoother and ensure a delicious result. Ready to bake? Let’s get going:
Measuring Cups and Spoons: For baking success, getting the right amounts of ingredients like flour, sugar, salt, and yeast is key. For this king cake recipe, you'll need both dry and liquid measuring cups, plus measuring spoons, to ensure precise measurements.
1-Quart Saucepan: Heating the milk mixture in a small, durable saucepan is best, as it gives you more control and allows you to watch the temperature closely—unlike a microwave, which can heat unevenly.
Instant-Read Thermometer: An instant-read thermometer ensures the milk reaches the ideal range of 120°F to 130°F for proper yeast activation and dough rise. It’s important to have the milk mixture at the correct temperature—too hot and it will kill the yeast, too cool and it will slow the development of the dough. It’s also helpful later in the process to check for the doneness of the bread, making sure it reaches an internal temperature of 190°F to 195°F.
Stand Mixer: A real time-saver for mixing and kneading the dough is a stand mixer with the paddle and dough hook attachments. It’s super helpful because it’s hands-free and more powerful than a hand mixer, which makes it good for stiffer doughs like this one. The dough hook does the hard work of kneading, leaving you with a smooth, elastic dough without the extra effort. But don’t worry if you don’t have one. A hand mixer will work just fine. See the Kitchen Tips at the end of the recipe for specific instructions.
Small Bowls: You’ll need two small bowls: one for mixing the filling and another for the frosting. If you only have one, just wash it in between—it’s that simple.
Rolling Pin: To ensure the correct thickness, use a rolling pin to roll the dough into an even rectangle. Look for one with sturdy, easy-to-hold handles, or try a French pin, which is a handle-free option that gives you more control.
Large Cookie Sheet: For baking the king cake, a flat aluminum sheet lined with parchment paper ensures easy cleanup and prevents sticking. The short sides allow for better air circulation, promoting even baking.
Cooling Rack: Essential for cooling the king cake after baking, a cooling rack allows air to circulate, preventing sogginess and helping the cake cool evenly.
How to Make King Cake
Making a homemade king cake may take a bit of time, but the result is absolutely worth it. Here’s a quick overview of the steps—keep reading for all the details and helpful tips to guide you through the process:
Making the Dough
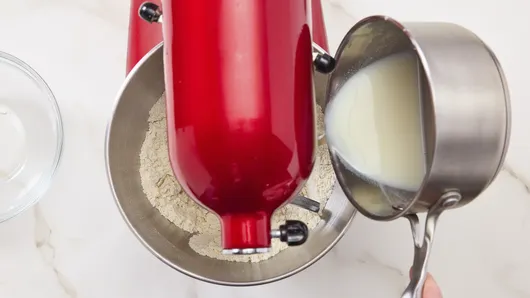
Mix flour and yeast in the bowl of a stand mixer with the paddle attachment. Heat the milk mixture to 120°F to 130°F—this is crucial, as the liquid needs to be at the right temperature to activate the yeast. Add the milk mixture to the mixer as it’s mixing, then mix in the beaten eggs. Keep mixing as you add the eggs, and don’t worry if there are lumps in the dough. The kneading will take care of that.
Working the Butter Into the Dough
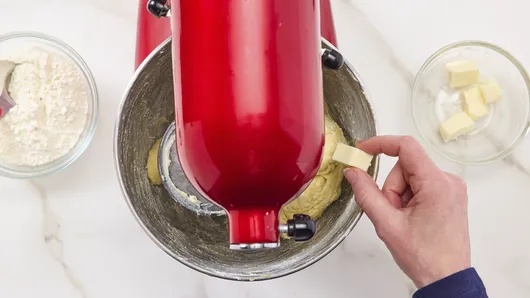
Switch to the dough hook, which will mimic the kneading process. Gradually add the remaining flour to form a soft dough. Then, add the butter one piece at a time, allowing each piece to absorb before adding the next. Be patient—this step takes time. If you warm each butter piece slightly by squeezing it between your fingers before adding, it helps it incorporate more easily.
Knead
Let the dough hook do its magic for about 5 minutes, adding flour only if necessary. This step is key, as you can’t always tell how much flour you’ll need right away. Keep adding a little bit at a time until the dough starts to pull away from the sides of the bowl. Keep going until you get there—your dough will let you know when it’s ready.
Stretch Test
Turn the dough out onto a floured surface and knead it by hand a few times to check its readiness. Pinch off a small piece of dough, and slowly stretch it like you are pulling a rubber band. If it stretches about 2 inches without tearing, it means the gluten has developed properly, and your dough is good to go.
Chill the Dough
Place the dough ball in a greased bowl, and cover it with plastic wrap. Let it rest in the refrigerator for at least 1 hour—but no longer than 2 hours. This step makes the dough easier to roll out later.
Make the Filling
You can prepare the filling while the dough is chilling. Simply mix the filling ingredients together, and set it aside until you're ready to assemble the cake.
Rolling the Dough
Punch down the chilled dough to release the air. Divide it in half, keeping one half refrigerated while working with the other to make it easier to handle. Sprinkle a little flour on the counter to help prevent the dough from sticking to the surface. Then, gently roll the dough into an 8x20-inch rectangle with your rolling pin, moving the dough around as you go to keep it from sticking. Feel free to use a kitchen ruler to check your progress. Dollop half of the filling over the dough, and use a small icing spatula to spread it out—it's easier than dropping it in the middle. Once spread, roll the dough into a log, then repeat with the second half.
Shape the Dough
Twist the two dough ropes into a circle, pinching the ends to seal. Place on a cookie sheet lined with parchment paper, cover with sprayed plastic wrap, and let it rise in a warm, draft-free area for about 1 hour. This could take a little longer depending on the temperature of your kitchen. As it rises, preheat your oven. Keep an eye on the dough—it should nearly double in size before you bake. If you rush this step, your baked bread may have a dense texture.
Bake
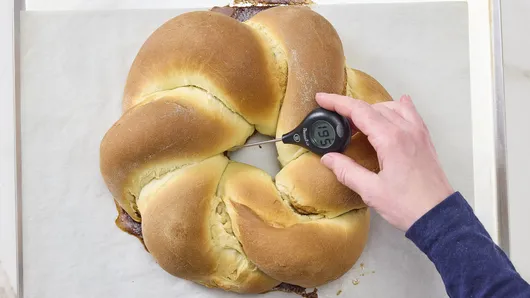
Place the king cake in the oven and bake for 28 minutes, or until golden brown. To check for doneness, insert an instant-read thermometer into the center of the cake—it should read between 190°F and 195°F. This ensures the bread is fully baked and not undercooked inside.
Cool
Once the king cake reaches the right temperature, remove it from the oven and let it sit on the cookie sheet for about 10 minutes. This gives the bread a chance to set before transferring. Then, slide off the parchment paper onto a cooling rack, and let it cool for about 30 minutes. It's important to let the bread cool completely before frosting so the icing doesn't slip off.
Frosting and Decorating
To make the frosting, mix powdered sugar, milk, and vanilla until smooth. If it’s too thick, add a little more milk to get it just right. Before frosting, hide the plastic baby (or another token) inside the cake. Once the cake is ready, spread the frosting over the top and finish with colorful sugars.
How to Store King Cake
King cake is best enjoyed the day it’s baked for the freshest flavor and texture, but it can be stored for up to 3 days at room temperature. To keep it fresh, cover the cake with plastic wrap, or place a large bowl over the cake to protect it from air. If you want to store it for a longer period, freeze the cake before frosting. Wrap it tightly in plastic wrap and foil to keep it fresh for up to 2 months. When ready to serve, thaw at room temperature and frost just before serving to prevent the icing from slipping off. If storing for up to 3 days, you can briefly reheat the cake to refresh its texture before enjoying.
More Mardi Gras Recipes
Fat Tuesday, or Mardi Gras, is the grand finale of the Carnival season, a day of indulgence before the austerity of Lent begins. It's a time for revelry, parades, music, and of course, food. In New Orleans, where the festivities reach their peak, the cuisine is a vibrant mix of French, African, Spanish, and Creole influences. Whether you're hosting a Fat Tuesday party or simply enjoying the day, we’ve got more recipes for you to browse:
French Quarter Beignets: Your guests will feel like they're in the French Quarter with these light, fluffy beignets, dusted with powdered sugar for this sweet New Orleans treat.
Pralines: Indulge in this New Orleans classic, where buttery sweetness and crunchy pecans combine for a decadent treat.
New Orleans “Best” Gumbo: This gumbo recipe packs bold, spicy flavors with shrimp, oysters, and a hearty blend of spices, making it perfect for serving a crowd.
Cajun Catfish: Enjoy the irresistible crunch and bold, savory flavors of catfish seasoned with Cajun Creole spices and fried to a golden crisp.
Frequently Asked Questions
King Cake
- Prep Time 1 hr 10 min
- Total 4 hr 55 min
- Servings 12
- Ingredients 16
Ingredients
Dough
- 4 cups Gold Medal™ All Purpose Flour
- 1 package fast-acting (instant) dry yeast (2 1/4 teaspoons)
- 1 cup milk
- 1/4 cup granulated sugar
- 1 teaspoon salt
- 2 eggs, beaten
- 6 tablespoons butter, softened, cut into 12 pieces
Filling
- 2 tablespoons butter, melted
- 1/4 cup packed brown sugar
- 1 tablespoon ground cinnamon
- 2 tablespoons light corn syrup
Frosting
- 1 1/2 cups powdered sugar
- 2 to 3 tablespoons milk
- 1/2 teaspoon vanilla
Decoration
- Miniature plastic baby, if desired
- Dark green, purple, and yellow or gold decorating sugars, if desired
Instructions
-
Step1To make dough: In large bowl of stand mixer, mix 2 1/2 cups flour and the yeast with paddle attachment on low speed until mixed together. In 1-quart saucepan, heat 1 cup milk, the granulated sugar, and salt over medium heat until very warm and an instant-read thermometer reads 120°F to 130°F. With mixer on low speed, pour in warm milk mixture, and mix until combined.
![]()
-
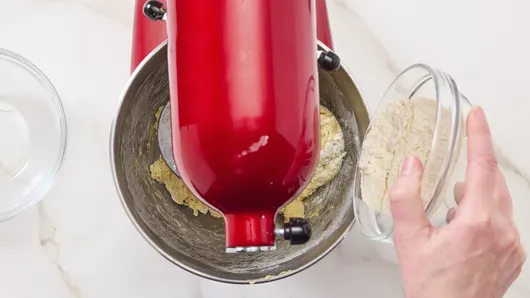
Step2Slowly add the eggs, and continue to mix until eggs are blended (dough will still have some lumps). Scrape bowl. Remove paddle attachment, and replace with dough hook. Gradually add the remaining 1 1/2 cups flour with mixer on low speed to make a soft dough. (Dough may look dry at this point but will come together when butter is added.)
![]()
-
Step3Gradually add the 6 tablespoons of softened butter, a piece at a time, kneading until each piece of butter is almost absorbed before adding the next piece. (Dough will look sticky.) Scrape side of bowl occasionally. Increase to medium speed, and continue kneading for 5 minutes or until dough is soft, smooth, and elastic. If dough seems too sticky, add additional flour 1 tablespoon at a time, mixing in thoroughly before determining if more flour is needed.
![]()
-
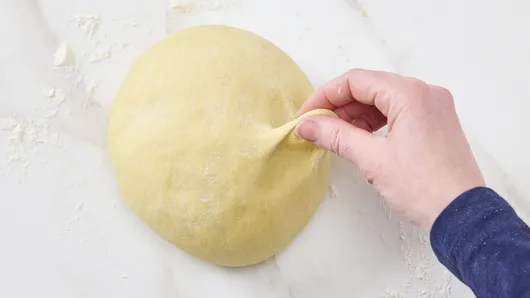
Step4
Turn the dough out onto lightly floured surface. Knead a few times by hand to be sure dough is soft, smooth, and elastic. To test elasticity, pinch a piece of the dough and slowly pull away; it should stretch about 2 inches without tearing. Form the dough into a ball. Spray a medium bowl with cooking spray. Place dough in bowl, turning dough to grease all sides. Cover bowl with plastic wrap, and refrigerate 1 hour.
![]()
-
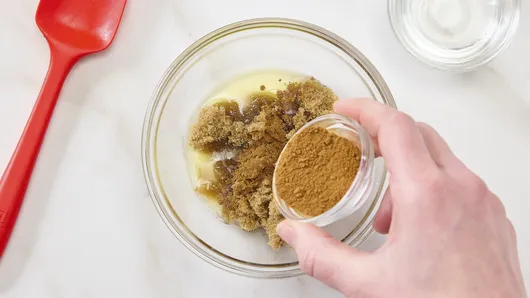
Step5To make filling: In small bowl, mix 2 tablespoons melted butter, the brown sugar, cinnamon, and corn syrup until well blended. Set aside.
![]()
-
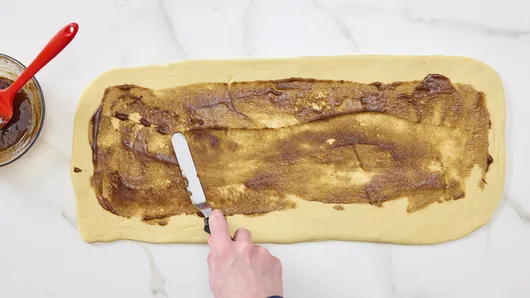
Step6Remove bowl from refrigerator. Gently push your fist into the dough to deflate it. Place dough on lightly floured surface. Divide the dough in half. Wrap one half of the dough, and return to refrigerator. Roll other half of the dough into an 8x20-inch rectangle. Spoon half of the filling mixture by dollops over dough, and spread within 1 inch of edges.
![]()
-
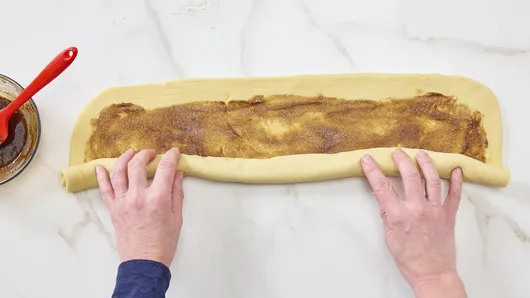
Step7Roll dough up, starting at one long side; pinch seam to seal. Gently roll back and forth to help seal seam and even out the length of the dough rope. Remove second half of dough from refrigerator, and repeat rolling, filling and rolling up.
![]()
-
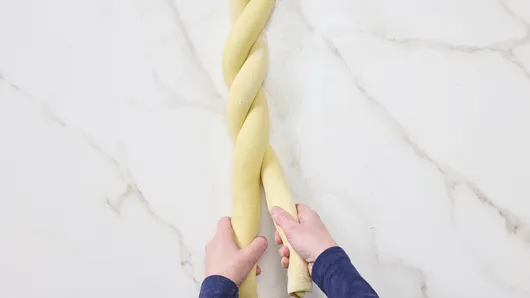
Step8Place the 2 ropes side by side. Pinch the 2 ends together at one end to seal together. Pick 1 rope up, and place over the other side of the second rope. Repeat and continue to loosely twist 1 rope over the other rope until you reach the end. Pinch the ends together to seal so there is 1 long twisted rope of dough.
![]()
-
Step9Line a large cookie sheet with cooking parchment paper. Place and form twisted rope into a circle on sheet, pinching ends together. Cover loosely with plastic wrap sprayed with cooking spray; let rise until almost doubled, about 1 hour.
![]()
-
Step10Heat oven to 350°F. Bake 28 to 34 minutes or until deep golden brown and an instant-read thermometer when inserted into bread reads 190°F to 195°F. Cool 10 minutes on pan, remove from cookie sheet to cooling rack. Cool completely, about 1 hour.
![]()
-
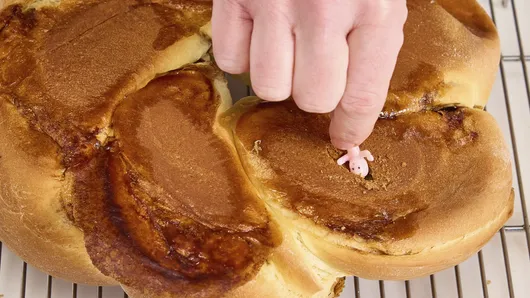
Step11To make frosting: In small bowl, mix powdered sugar, 2 tablespoons milk, and the vanilla until smooth. If frosting is too stiff to spread, add additional milk, 1/2 teaspoon at a time. Before spreading frosting, hide the miniature plastic baby in the bread. Turn the cooled bread over, and make a small slit in the bottom. Press the plastic baby into the slit in the bottom of the bread. Return the bread to right side up.
![]()
-
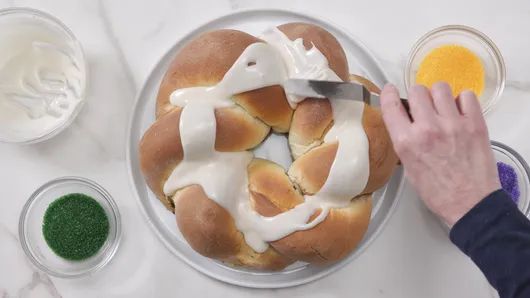
Step12Spread frosting over top of the bread. Immediately sprinkle on colored sugars, alternating the three colors.
![]()
-
Step13When ready to serve, remind people that there is a hidden plastic baby in bread. Store loosely covered at room temperature.

Nutrition
Nutrition Facts
Serving Size: 1 Slice
- Calories
- 290
- Calories from Fat
- 70
- Total Fat
- 8g
- 13%
- Saturated Fat
- 4 1/2g
- 23%
- Trans Fat
- 0g
- Cholesterol
- 50mg
- 17%
- Sodium
- 270mg
- 11%
- Potassium
- 105mg
- 3%
- Total Carbohydrate
- 46g
- 15%
- Dietary Fiber
- 2g
- 7%
- Sugars
- 12g
- Protein
- 6g
% Daily Value*:
- Vitamin A
- 6%
- 6%
- Vitamin C
- 0%
- 0%
- Calcium
- 6%
- 6%
- Iron
- 10%
- 10%


