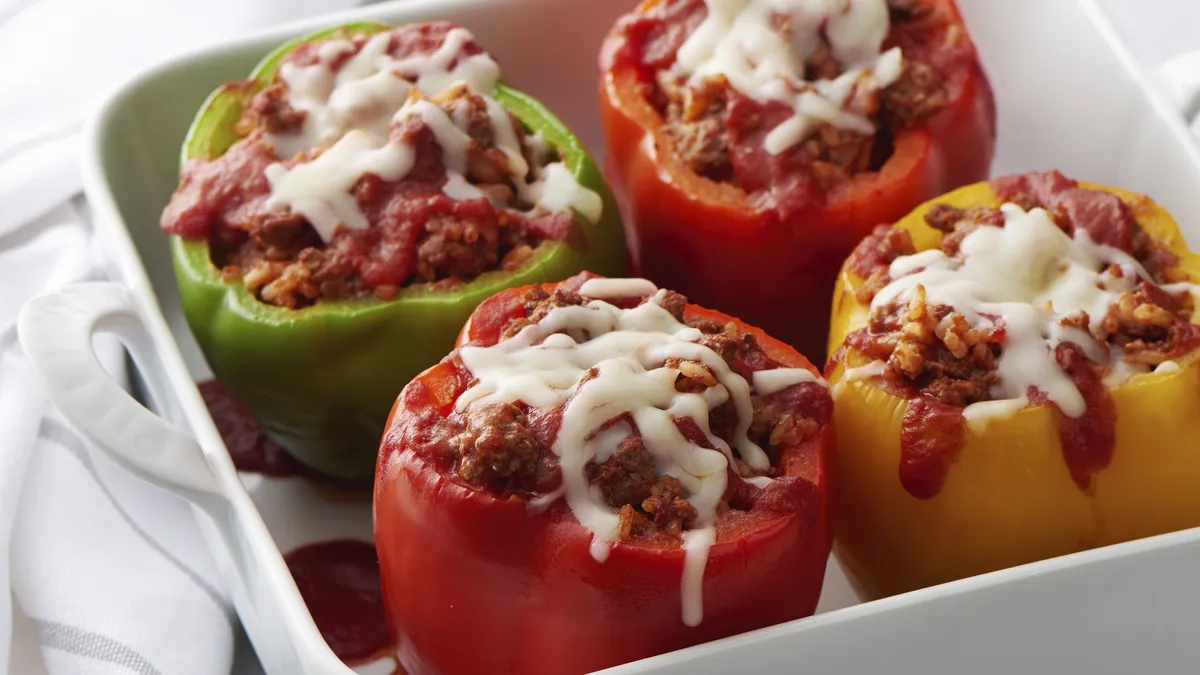
Recipe Ingredients
The ingredients for making stuffed bell peppers are basic and easy to find.
Bell Peppers: After stuffing peppers for 70 years, we’ve found it pays to be picky when selecting which peppers to use. Choose large peppers that are consistent in size, shape and that have a level bottom, so they don’t tip over in the baking pan.
Ground Beef: Our experts have found that 80% lean ground beef is the best balance of cost and flavor in this recipe—it’s not too greasy or the most expensive.
Rice: Any cooked regular white or brown rice can be used in this recipe. Whole grain rice will stand up better to cooking than instant rice, which can get mushy when reheated.
Tomato Sauce: It provides both moisture and taste to tie the ingredient flavors together.
Cheese: We chose to use mozzarella cheese because it melts easily with a neutral flavor, so it won’t overpower the other ingredients.
Other Ingredients You’ll Need: Onion, garlic and salt are the only additional ingredients you’ll need to add flavor.
Cookware You’ll Need
A few key pieces of cookware and you’ll have beef stuffed peppers ready in no time.
Dutch Oven: This large pot has enough space to hold the peppers and evenly cook them.
10-Inch Skillet: We have found in testing that either a regular or a nonstick skillet will work for this recipe. There is enough fat in the ground beef to keep the ingredients from sticking to either of these skillets.
8-Inch Glass Baking Dish: This is the perfect size to hold the peppers and prevent them from falling over while baking. We prefer glass over metal as it absorbs heat slower, providing a more even bake.
Other Equipment You’ll Need: Chef’s knife, cutting board, dry measuring cups, measuring spoons, heatproof large spoon or spatula, aluminum foil, cookie spatula.
How to Make Stuffed Peppers
Here’s how to easily make these delicious stuffed peppers.
1. Cut the Peppers
Once the tops have been cut off, remove the seeds and white membranes of the peppers with your hand. Stand the peppers upright in the baking dish to make it easier for stuffing later.
2. Precook the Peppers
Cook the bell peppers in a large pan of boiling water to soften them slightly before they are filled and baked. Testing found this is an important step to prevent the peppers from still being crisp after baking.
3. Cook Beef Mixture
Cooking the beef with the onion saves a step. Cook until the largest clumps of beef are no longer pink inside.
4. Fill the Peppers
During testing we found that placing the peppers in the baking dish before filling is the way to go.
5. Bake the Peppers
Bake 10 minutes covered with foil to give the peppers a jump on getting hot. Then remove the foil and finish baking, uncovered, for another 15 minutes to get the perfect bell pepper texture.
6. Sprinkle and Serve
Sprinkle with the cheese as soon as the stuffed peppers come out of the oven, so it can melt. Use a cookie spatula to move the stuffed peppers to dinner plates and enjoy them while they’re hot and melty.
Possible Variations
With a few ingredient changes, you can make your stuffed peppers different every time.
Swap the Meat: Instead of ground beef, use ground chicken, turkey, or pork for a similar flavor. To add a little spicy heat, try bulk hot Italian pork sausage.
Choose Another Grain: Use whatever cooked rice you have on hand, or swap in a cooked grain for a nuttier flavor. Try cooked arborio or brown rice (not instant), cooked quinoa, bulgur, or farro.
Add Seasonings: Try adding 1 teaspoon of Italian seasoning, 1 teaspoon of chili powder with 1/2 teaspoon cumin, or 1 teaspoon of dried oregano leaves to the filling for even more flavor.
Make It Your Own: We’ve heard from you that you are also finding other ways to customize our basic recipe. “…I used Mexican Style Street Corn and salsa instead of tomato sauce. Then I added 1/2 cup sour cream to the mix before stuffing the peppers. Amazing!!" Or for smaller households, our Taco Stuffed Peppers are perfectly sized.
Serving the Peppers
Since these stuffed peppers contain protein (beef), carbohydrates (rice) and veggies (bell peppers and tomato sauce), they are a complete meal—you can serve them by themselves. Or, if you want more to fill your dinner plates, try any of these sides which are delicious complements in terms of taste and texture.
Crusty or Warm-from-the-Oven Bread: We love a warm square of Cornbread, slathered with butter. Or you can pick up a loaf of take-and-bake garlic bread to serve alongside the stuffed peppers.
Green Salad or Veggies: Caesar salad is a classic salad that tastes great with the stuffed peppers or serve up a side of garlic green beans.
Storing and Reheating
These helpful storage tips will ensure your stuffed peppers turn out as deliciously as if made fresh.
Make-Ahead
Prepare the peppers as directed in Step 2. Place them upside-down on a paper towel-lined plate. Cover and refrigerate up to 8 hours. When you’re ready to finish and bake the peppers, continue with Step 3. For the best texture and for food safety, we don’t recommend filling and storing the peppers ahead of time.
Refrigerator Storage
Refrigerate any remaining baked and cooled peppers within 2 hours. Store right in the baking dish covered with plastic wrap or move them to a resealable food storage container. Store in the refrigerator up to 2 days.
Freezer Storage
We do not recommend storing leftover stuffed peppers in the freezer as the peppers will water out, making the filling and the peppers soggy.
Reheating Stuffed Peppers
Place a pepper on a microwavable plate. Cover loosely and microwave on Medium-High (70%) 2 to 3 minutes or until an instant-read food thermometer inserted in the center reaches at least 165°F. The peppers will be slightly softer than when first baked, but still delicious.
Why Betty Users Love This Recipe
We’ve heard from our community of makers that this recipe is a hit with both kids and spouses, so it’s a winning choice when you’re trying to decide what’s for dinner. With over 500 reviews, cooks find this recipe simple and straightforward, citing even beginning cooks can get great results.
These stuffed peppers are consistently described as both delicious and flavorful. Users enjoy the basic combination of ingredients but also the ability to add their own touches to enhance or change up the taste.
Frequently Asked Questions
How Do I Prevent My Peppers from Getting Soggy?
Follow these simple tips to prevent your stuffed peppers from becoming soggy.
Precook as Directed: Only cook the peppers for 2 minutes in boiling water as directed in step 2. Cooking the peppers too long will over soften the cell walls within the pepper causing them to release additional water during baking, creating a soggy texture.
Bake Peppers After Filling: Bake the stuffed peppers right after filling, so the moisture and heat from the meat mixture doesn’t start to soften the peppers before baking.
Store Baked Peppers Properly: See the Storing and Reheating section above. Incorrect storage can lead to soggy stuffed peppers.
Do I Need to Boil the Peppers Before Stuffing?
With the testing we’ve done on stuffed pepper recipes over the last 70 years, our taste panels have preferred peppers that are tender but not mushy, as they are easier to eat have a more pleasing texture when enjoyed with the filling.
After trying several methods, we have found that precooking the peppers for 2 minutes provides the perfect texture once baked with the filling.
How to Keep Stuffed Peppers from Falling Over?
Trim Them so They Sit Flat: Before cooking, test your peppers to see if they can stand up on their own. If not, cut a very thin slice from the bottom of the pepper to create a level surface. Just be careful not to cut a hole in the bottom of the pepper or the filling will leak out during baking.
Keep Peppers Crisp for Filling: Precook the peppers only 2 minutes so they won’t get too soft for filling and want to fall over.
Support the Peppers While Baking: If the peppers still won’t stand upright, support them in the baking dish with balls of foil between the peppers and/or the side of the baking dish.
(function() {
document.addEventListener('DOMContentLoaded', function() {
var componentMetadata = JSON.parse('\x7b\x22componentName\x22\x3a\x22RecipeFAQ_2ee1ece6-a33c-4f37-aafb-6377bfa48ff1\x22,\x22deferOptions\x22\x3a\x7b\x22deferComponent\x22\x3afalse,\x22deferType\x22\x3a\x22None\x22,\x22deferId\x22\x3a\x22rb6a61a7a08454898bfe40fb4b09250b8\x22,\x22deferredContainerId\x22\x3a\x22\x2fmain\x2frdpFAQ\x22,\x22deferredContainerView\x22\x3anull\x7d,\x22viewName\x22\x3a\x22RecipeFAQ\x22\x7d');
var configuration = {"title":"Stuffed Peppers","introduction":"\u003cp\u003eThis scrumptious dinner, while it\u0027s been a Betty Crocker recipe for nearly 70 years, is still a favorite today. Colorful, sweet bell peppers are stuffed with flavorful ground beef, tomato, and rice. Melty mozzarella cheese completes the dish. With over 500 top-rated reviews, you can enjoy the basic recipe or customize it to suit your family’s tastes.\u003c/p\u003e\u003cp\u003eOur first stuffed bell pepper recipe appeared in the 1956 Betty Crocker Cookbook; developed in the test kitchens as a way to get a delicious and affordable family supper on the table. To keep costs down, only 1/2 pound of ground beef was used; bulked up with breadcrumbs. Over the years, we’ve made the peppers heartier by increasing the amount of ground beef and switching from breadcrumbs to rice. The servings have been adjusted for today’s average family size, and with a rainbow of bell pepper colors available, you can now choose your favorites.\u003c/p\u003e","servingSize":"1 Serving","image":{"small":{"media":"(min-width: 0px)","src":"https://mojo.generalmills.com/api/public/content/wD6Zdi1fS0OIerKfD62IBA_webp_base.webp?v=b85d1eda\u0026t=e724eca7b3c24a8aaa6e089ed9e611fd"},"medium":{"media":"(min-width: 500px)","src":"https://mojo.generalmills.com/api/public/content/wD6Zdi1fS0OIerKfD62IBA_webp_base.webp?v=b85d1eda\u0026t=191ddcab8d1c415fa10fa00a14351227"},"large":{"media":"(min-width: 767px)","src":"https://mojo.generalmills.com/api/public/content/wD6Zdi1fS0OIerKfD62IBA_webp_base.webp?v=b85d1eda\u0026t=191ddcab8d1c415fa10fa00a14351227"},"alt":"Stuffed Peppers"},"contributor":{"label":"By","name":"Betty Crocker Kitchens","profileUrl":"/about-us","displayDate":{"label":"Updated","date":"Mar 10, 2025"}},"ingredientGroups":[{"ingredients":[{"quantity":"4","description":"large bell peppers (any color)"},{"quantity":"1","description":"lb lean (at least 80%) ground beef"},{"quantity":"2","description":"tablespoons chopped onion"},{"quantity":"1","description":"cup cooked rice"},{"quantity":"1","description":"teaspoon salt"},{"quantity":"1","description":"clove garlic, finely chopped"},{"quantity":"1","description":"can (15 oz) Muir Glen™ Organic Tomato Sauce"},{"quantity":"3/4","description":"cup shredded mozzarella cheese (3 oz)"}]}],"steps":[{"description":"Heat oven to 350°F."},{"description":"\u003cp\u003eCut thin slice from the stem end of each bell pepper to remove top of pepper. Remove seeds and membranes, rinse peppers. If necessary, cut thin slice from bottom of each pepper so they stand up straight.\u003c/p\u003e","stepShotImageUrl":"//mojo.generalmills.com/api/public/content/_-Pcp0O8HUOnHUd76idIzg_webp_base.webp?v=2fc22290\u0026t=51a43a57af4046789e5a7f20567b1195"},{"description":"\u003cp\u003eIn 4-quart Dutch oven, add enough water to cover peppers. Heat to boiling; add peppers. Cook about 2 minutes; drain.\u003c/p\u003e"},{"description":"\u003cp\u003eIn 10-inch skillet, cook beef and onion over medium heat 8 to 10 minutes, stirring occasionally, until beef is brown; drain. Return beef mixture to same skillet.\u003c/p\u003e","stepShotImageUrl":"//mojo.generalmills.com/api/public/content/qALhDgtUgESSJrMEX13ZQA_webp_base.webp?v=ee646982\u0026t=51a43a57af4046789e5a7f20567b1195"},{"description":"\u003cp\u003eStir in rice, salt, garlic and 1 cup of the tomato sauce; cook until heated through.\u003c/p\u003e"},{"description":"\u003cp\u003eStand peppers upright in ungreased 8-inch square glass baking dish. Stuff peppers with beef mixture. Pour remaining tomato sauce over peppers.\u003c/p\u003e","stepShotImageUrl":"//mojo.generalmills.com/api/public/content/_N-diAn6DUeLo6Gw2TU6tQ_webp_base.webp?v=c5ed6266\u0026t=51a43a57af4046789e5a7f20567b1195"},{"description":"\u003cp\u003eCover tightly with foil. Bake 10 minutes. Uncover and bake about 15 minutes longer or until peppers are tender. Remove from oven; immediately sprinkle with cheese.\u003c/p\u003e"}],"tips":[{"title":"","description":"Our family-favorite Stuffed Peppers recipe is a dinner that’s absolutely delicious, according to our fans. We’ll show you just how easy they are to make.","category":"Rich Snippet"},{"title":"","description":"\u003cp\u003ePlacing the bell peppers in the baking dish before filling them is easier than trying to move filled peppers.\u003c/p\u003e","category":"Techniques"},{"title":"","description":"\u003cp\u003eGot a leftover partial onion in your fridge? You’ll need approximately 1/4 of a small onion to get 2 tablespoons chopped.\u003c/p\u003e","category":"Recipe/Ingredient Facts"},{"title":"","description":"\u003cp\u003eWe’ve developed the filling amount to just fill the bell peppers without any leftover. If you add other ingredients, you may end up with leftover filling, unless you adjust the other ingredients or fill additional bell peppers.\u003c/p\u003e","category":"Recipe/Ingredient Facts"},{"title":"","description":"Sprinkle a little chopped fresh oregano or parsley over each pepper before serving.","category":"Serving Suggestions/Menu"},{"title":"","description":"\u003cp\u003eHow do you eat stuffed peppers? When they are on dinner plates, cut through them vertically into halves, using your knife and fork. Then tip the halves so that the filling sides are up. Cut them into bite-size pieces.\u003c/p\u003e","category":"No Title"},{"title":"","description":"Recipe meets Kitchen Tested criteria. Reviewed as part of project MSO-5941 BC Audit 200 recipes","category":"Kitchen Tested"}],"kitchenTips":[{"title":"","description":"\u003cp\u003ePlacing the bell peppers in the baking dish before filling them is easier than trying to move filled peppers.\u003c/p\u003e","category":"Techniques"},{"title":"","description":"\u003cp\u003eGot a leftover partial onion in your fridge? You’ll need approximately 1/4 of a small onion to get 2 tablespoons chopped.\u003c/p\u003e","category":"Recipe/Ingredient Facts"},{"title":"","description":"\u003cp\u003eWe’ve developed the filling amount to just fill the bell peppers without any leftover. If you add other ingredients, you may end up with leftover filling, unless you adjust the other ingredients or fill additional bell peppers.\u003c/p\u003e","category":"Recipe/Ingredient Facts"},{"title":"","description":"Sprinkle a little chopped fresh oregano or parsley over each pepper before serving.","category":"Serving Suggestions/Menu"},{"title":"","description":"\u003cp\u003eHow do you eat stuffed peppers? When they are on dinner plates, cut through them vertically into halves, using your knife and fork. Then tip the halves so that the filling sides are up. Cut them into bite-size pieces.\u003c/p\u003e","category":"No Title"}],"additionalContent":[{"title":"Recipe Ingredients","description":"\u003cp\u003eThe ingredients for making stuffed bell peppers are basic and easy to find.\u003c/p\u003e\u003cp\u003e\u003cstrong\u003eBell Peppers:\u003c/strong\u003e After stuffing peppers for 70 years, we’ve found it pays to be picky when selecting which peppers to use. Choose large peppers that are consistent in size, shape and that have a level bottom, so they don’t tip over in the baking pan.\u003c/p\u003e\u003cp\u003e\u003cstrong\u003eGround Beef:\u003c/strong\u003e Our experts have found that 80% lean ground beef is the best balance of cost and flavor in this recipe—it’s not too greasy or the most expensive.\u003c/p\u003e\u003cp\u003e\u003cstrong\u003eRice:\u003c/strong\u003e Any cooked regular white or brown rice can be used in this recipe. Whole grain rice will stand up better to cooking than instant rice, which can get mushy when reheated.\u003c/p\u003e\u003cp\u003e\u003cstrong\u003eTomato Sauce: \u003c/strong\u003eIt provides both moisture and taste to tie the ingredient flavors together.\u003c/p\u003e\u003cp\u003e\u003cstrong\u003eCheese:\u003c/strong\u003e We chose to use mozzarella cheese because it melts easily with a neutral flavor, so it won’t overpower the other ingredients.\u003c/p\u003e\u003cp\u003e\u003cstrong\u003eOther Ingredients You’ll Need: \u003c/strong\u003eOnion, garlic and salt are the only additional ingredients you’ll need to add flavor.\u003c/p\u003e","category":"SEO Content_1"},{"title":"Cookware You’ll Need","description":"\u003cp\u003eA few key pieces of cookware and you’ll have beef stuffed peppers ready in no time.\u003c/p\u003e\u003cp\u003e\u003cstrong\u003eDutch Oven:\u003c/strong\u003e This large pot has enough space to hold the peppers and evenly cook them.\u003c/p\u003e\u003cp\u003e\u003cstrong\u003e10-Inch Skillet:\u003c/strong\u003e We have found in testing that either a regular or a nonstick skillet will work for this recipe. There is enough fat in the ground beef to keep the ingredients from sticking to either of these skillets.\u003c/p\u003e\u003cp\u003e\u003cstrong\u003e8-Inch Glass Baking Dish:\u003c/strong\u003e This is the perfect size to hold the peppers and prevent them from falling over while baking. We prefer glass over metal as it absorbs heat slower, providing a more even bake.\u003c/p\u003e\u003cp\u003e\u003cstrong\u003eOther Equipment You’ll Need: \u003c/strong\u003eChef’s knife, cutting board, dry measuring cups, measuring spoons, heatproof large spoon or spatula, aluminum foil, cookie spatula.\u003c/p\u003e","category":"SEO Content_2"},{"title":"How to Make Stuffed Peppers","description":"\u003cp\u003eHere’s how to easily make these delicious stuffed peppers.\u003c/p\u003e\u003ch3\u003e\u003cstrong\u003e1. Cut the Peppers\u003c/strong\u003e\u003c/h3\u003e\u003cp\u003eOnce the tops have been cut off, remove the seeds and white membranes of the peppers with your hand. Stand the peppers upright in the baking dish to make it easier for stuffing later.\u003c/p\u003e\u003ch3\u003e\u003cstrong\u003e2. Precook the Peppers\u003c/strong\u003e\u003c/h3\u003e\u003cp\u003eCook the bell peppers in a large pan of boiling water to soften them slightly before they are filled and baked. Testing found this is an important step to prevent the peppers from still being crisp after baking.\u003c/p\u003e\u003ch3\u003e\u003cstrong\u003e3. Cook Beef Mixture\u003c/strong\u003e\u003c/h3\u003e\u003cp\u003eCooking the beef with the onion saves a step. Cook until the largest clumps of beef are no longer pink inside.\u003c/p\u003e\u003ch3\u003e\u003cstrong\u003e4. Fill the Peppers\u003c/strong\u003e\u003c/h3\u003e\u003cp\u003eDuring testing we found that placing the peppers in the baking dish before filling is the way to go.\u003c/p\u003e\u003ch3\u003e\u003cstrong\u003e5. Bake the Peppers\u003c/strong\u003e\u003c/h3\u003e\u003cp\u003eBake 10 minutes covered with foil to give the peppers a jump on getting hot. Then remove the foil and finish baking, uncovered, for another 15 minutes to get the perfect bell pepper texture.\u003c/p\u003e\u003ch3\u003e\u003cstrong\u003e6. Sprinkle and Serve\u003c/strong\u003e\u003c/h3\u003e\u003cp\u003eSprinkle with the cheese as soon as the stuffed peppers come out of the oven, so it can melt. Use a cookie spatula to move the stuffed peppers to dinner plates and enjoy them while they’re hot and melty.\u003c/p\u003e","category":"SEO Content_3"},{"title":"Possible Variations","description":"\u003cp\u003eWith a few ingredient changes, you can make your stuffed peppers different every time.\u003c/p\u003e\u003cp\u003e\u003cstrong\u003eSwap the Meat:\u003c/strong\u003e Instead of ground beef, use ground chicken, turkey, or pork for a similar flavor. To add a little spicy heat, try bulk hot Italian pork sausage.\u003c/p\u003e\u003cp\u003e\u003cstrong\u003eChoose Another Grain:\u003c/strong\u003e Use whatever cooked rice you have on hand, or swap in a cooked grain for a nuttier flavor. Try cooked arborio or brown rice (not instant), cooked quinoa, bulgur, or farro.\u003c/p\u003e\u003cp\u003e\u003cstrong\u003eAdd Seasonings:\u003c/strong\u003e Try adding 1 teaspoon of Italian seasoning, 1 teaspoon of chili powder with 1/2 teaspoon cumin, or 1 teaspoon of dried oregano leaves to the filling for even more flavor.\u003c/p\u003e\u003cp\u003e\u003cstrong\u003eMake It Your Own:\u003c/strong\u003e We’ve heard from you that you are also finding other ways to customize our basic recipe. “…I used Mexican Style Street Corn and salsa instead of tomato sauce. Then I added 1/2 cup sour cream to the mix before stuffing the peppers. Amazing!!\u0022 Or for smaller households, our \u003ca href=\u0022https://www.bettycrocker.com/recipes/taco-seasoned-stuffed-peppers/81c8d8d7-0733-4b76-9c2e-f55976ceae50\u0022\u003eTaco Stuffed Peppers\u003c/a\u003e are perfectly sized.\u003c/p\u003e","category":"SEO Content_4"},{"title":"Serving the Peppers","description":"\u003cp\u003eSince these stuffed peppers contain protein (beef), carbohydrates (rice) and veggies (bell peppers and tomato sauce), they are a complete meal—you can serve them by themselves. Or, if you want more to fill your dinner plates, try any of these sides which are delicious complements in terms of taste and texture.\u003c/p\u003e\u003cp\u003e\u003cstrong\u003eCrusty or Warm-from-the-Oven Bread:\u003c/strong\u003e We love a warm square of \u003ca href=\u0022https://www.bettycrocker.com/recipes/traditional-cornbread-recipe/8990e15c-fc1d-4a8d-b8b3-4b37f45eca49\u0022\u003eCornbread\u003c/a\u003e, slathered with butter. Or you can pick up a loaf of take-and-bake garlic bread to serve alongside the stuffed peppers.\u003c/p\u003e\u003cp\u003e\u003cstrong\u003eGreen Salad or Veggies:\u003c/strong\u003e \u003ca href=\u0022https://www.bettycrocker.com/recipes/caesar-salad/2787ce54-0843-43fc-a878-3b657ddb839d\u0022\u003eCaesar salad\u003c/a\u003e is a classic salad that tastes great with the stuffed peppers or serve up a side of \u003ca href=\u0022https://www.bettycrocker.com/recipes/garlic-green-beans/f4927c15-601d-42a4-9c7f-6a79f4d82e16\u0022\u003egarlic green beans\u003c/a\u003e.\u003c/p\u003e","category":"SEO Content_5"},{"title":"Storing and Reheating","description":"\u003cp\u003eThese helpful storage tips will ensure your stuffed peppers turn out as deliciously as if made fresh.\u003c/p\u003e\u003ch3\u003e\u003cstrong\u003eMake-Ahead\u003c/strong\u003e\u003c/h3\u003e\u003cp\u003ePrepare the peppers as directed in Step 2. Place them upside-down on a paper towel-lined plate. Cover and refrigerate up to 8 hours. When you’re ready to finish and bake the peppers, continue with Step 3. For the best texture and for food safety, we don’t recommend filling and storing the peppers ahead of time.\u003c/p\u003e\u003ch3\u003e\u003cstrong\u003eRefrigerator Storage\u003c/strong\u003e\u003c/h3\u003e\u003cp\u003eRefrigerate any remaining baked and cooled peppers within 2 hours. Store right in the baking dish covered with plastic wrap or move them to a resealable food storage container. Store in the refrigerator up to 2 days.\u003c/p\u003e\u003ch3\u003e\u003cstrong\u003eFreezer Storage\u003c/strong\u003e\u003c/h3\u003e\u003cp\u003eWe do not recommend storing leftover stuffed peppers in the freezer as the peppers will water out, making the filling and the peppers soggy.\u003c/p\u003e\u003ch3\u003e\u003cstrong\u003eReheating Stuffed Peppers\u003c/strong\u003e\u003c/h3\u003e\u003cp\u003ePlace a pepper on a microwavable plate. Cover loosely and microwave on Medium-High (70%) 2 to 3 minutes or until an instant-read food thermometer inserted in the center reaches at least 165°F. The peppers will be slightly softer than when first baked, but still delicious.\u003c/p\u003e","category":"SEO Content_6"},{"title":"Why Betty Users Love This Recipe","description":"\u003cp\u003eWe’ve heard from our community of makers that this recipe is a hit with both kids and spouses, so it’s a winning choice when you’re trying to decide what’s for dinner. With over 500 reviews, cooks find this recipe simple and straightforward, citing even beginning cooks can get great results.\u003c/p\u003e\u003cp\u003eThese stuffed peppers are consistently described as both delicious and flavorful. Users enjoy the basic combination of ingredients but also the ability to add their own touches to enhance or change up the taste.\u003c/p\u003e","category":"SEO Content_7"}],"faq":[{"title":"How Do I Prevent My Peppers from Getting Soggy?","description":"\u003cp\u003eFollow these simple tips to prevent your stuffed peppers from becoming soggy.\u003c/p\u003e\u003cp\u003e\u003cstrong\u003ePrecook as Directed:\u003c/strong\u003e Only cook the peppers for 2 minutes in boiling water as directed in step 2. Cooking the peppers too long will over soften the cell walls within the pepper causing them to release additional water during baking, creating a soggy texture.\u003c/p\u003e\u003cp\u003e\u003cstrong\u003eBake Peppers After Filling:\u003c/strong\u003e Bake the stuffed peppers right after filling, so the moisture and heat from the meat mixture doesn’t start to soften the peppers before baking.\u003c/p\u003e\u003cp\u003e\u003cstrong\u003eStore Baked Peppers Properly:\u003c/strong\u003e See the Storing and Reheating section above. Incorrect storage can lead to soggy stuffed peppers.\u003c/p\u003e","category":"FAQ_1"},{"title":"Do I Need to Boil the Peppers Before Stuffing?","description":"\u003cp\u003eWith the testing we’ve done on stuffed pepper recipes over the last 70 years, our taste panels have preferred peppers that are tender but not mushy, as they are easier to eat have a more pleasing texture when enjoyed with the filling.\u003c/p\u003e\u003cp\u003eAfter trying several methods, we have found that precooking the peppers for 2 minutes provides the perfect texture once baked with the filling.\u003c/p\u003e","category":"FAQ_2"},{"title":"How to Keep Stuffed Peppers from Falling Over?","description":"\u003cp\u003e\u003cstrong\u003eTrim Them so They Sit Flat:\u0026nbsp;\u003c/strong\u003e Before cooking, test your peppers to see if they can stand up on their own. If not, cut a very thin slice from the bottom of the pepper to create a level surface. Just be careful not to cut a hole in the bottom of the pepper or the filling will leak out during baking.\u003c/p\u003e\u003cp\u003e\u003cstrong\u003eKeep Peppers Crisp for Filling:\u003c/strong\u003e Precook the peppers only 2 minutes so they won’t get too soft for filling and want to fall over.\u003c/p\u003e\u003cp\u003e\u003cstrong\u003eSupport the Peppers While Baking:\u003c/strong\u003e If the peppers still won’t stand upright, support them in the baking dish with balls of foil between the peppers and/or the side of the baking dish.\u003c/p\u003e","category":"FAQ_3"}],"tipCategories":[{"categoryName":"Kitchen Tested","heading":"More About This Recipe","cssClass":"recipePartStory","expandOnInit":false,"expandText":"More +","collapseText":"Less -","expandEventName":"","collapseEventName":"","image":"","tips":[{"title":"","description":"Recipe meets Kitchen Tested criteria. Reviewed as part of project MSO-5941 BC Audit 200 recipes","category":"Kitchen Tested"}],"isExpandable":false},{"categoryName":"Rich Snippet","heading":"","cssClass":"recipePartMethodNote","expandOnInit":false,"expandText":"More +","collapseText":"Less -","expandEventName":"","collapseEventName":"","image":"","tips":[{"title":"","description":"Our family-favorite Stuffed Peppers recipe is a dinner that’s absolutely delicious, according to our fans. We’ll show you just how easy they are to make.","category":"Rich Snippet"}],"isExpandable":false}],"nutritionInfo":{"configuration":{"showAsTable":false,"noNutritionInformationAvailableMessage":"Nutrition Facts are not available for this recipe","poweredByText":"\u003cp\u003eNutrition information for this recipe is estimated using a leading nutrition calculation application, but is an estimate only. Actual nutrition values will vary based on the exact ingredients or brands you may use.\u003c/p\u003e\n\u003ca href=\u0022http://developer.edamam.com\u0022\u003ePowered By \u003cimg src=\u0022-/media/05422024943D4056883B09BBC2576F20.ashx\u0022 alt=\u0022Edamam\u0022 /\u003e\u003c/a\u003e","nutritionChartTitle":"Nutrition Facts","nutritionInformationLabel":"Nutrition","servingSizeText":"Serving Size:","dailyValuesDisclaimer":"*Percent Daily Values are based on a 2,000 calorie diet.","percentDailyValueText":"% Daily Value","percentDailyValueFooterTitleText":"% Daily Value*:","exchangeInformationTitleText":"Exchanges:","nutritionFactsExpandText":"More Nutrition","nutritionFactsCollapseText":"Less Nutrition"},"facts":{"carbohydrateChoice":{"amountPercent":"","amountUnits":"2","title":"Carbohydrate Choice"},"vitaminA":{"amountPercent":"30%","amountUnits":"30%","title":"Vitamin A"},"vitaminC":{"amountPercent":"120%","amountUnits":"120%","title":"Vitamin C"},"calcium":{"amountPercent":"20%","amountUnits":"20%","title":"Calcium"},"iron":{"amountPercent":"20%","amountUnits":"20%","title":"Iron"},"protein":{"amountPercent":"","amountUnits":"29g","title":"Protein"},"dietaryFiber":{"amountPercent":"19%","amountUnits":"4g","title":"Dietary Fiber"},"sugars":{"amountPercent":"","amountUnits":"8g","title":"Sugars"},"totalCarbohydrate":{"amountPercent":"10%","amountUnits":"29g","title":"Total Carbohydrate"},"sodium":{"amountPercent":"61%","amountUnits":"1470mg","title":"Sodium"},"potassium":{"amountPercent":"16%","amountUnits":"540mg","title":"Potassium"},"cholesterol":{"amountPercent":"27%","amountUnits":"80mg","title":"Cholesterol"},"transFat":{"amountPercent":"","amountUnits":"1g","title":"Trans Fat"},"saturatedFat":{"amountPercent":"36%","amountUnits":"7g","title":"Saturated Fat"},"totalFat":{"amountPercent":"27%","amountUnits":"17g","title":"Total Fat"},"caloriesFromFat":{"amountPercent":"","amountUnits":"160","title":"Calories from Fat"},"calories":{"amountPercent":"","amountUnits":"390","title":"Calories"}},"servingSize":"1 Serving","exchangeInfo":"1/2 Starch; 0 Fruit; 1/2 Other Carbohydrate; 0 Skim Milk; 0 Low-Fat Milk; 0 Milk; 3 Vegetable; 0 Very Lean Meat; 2 1/2 Lean Meat; 0 High-Fat Meat; 1 1/2 Fat;","showPoweredBy":false,"showRecipeTotalTime":true,"showRecipePrepTime":true,"showCarbohydrateChoices":true},"trademarks":[],"labels":{"ingredientsHeader":"Ingredients","stepsHeader":"Instructions","stepsImageHideText":"Hide Images","stepsImageShowText":"Show Images","stepNumberText":"Step","faqHeader":"Frequently Asked Questions","tipsHeader":"Tips from the Betty Crocker Kitchens","tipItemHeadingFormat":"tip {0}","postedBy":"By","copyright":"© {yyyy} ®/TM General Mills All Rights Reserved","showDrawerText":"Show ","hideDrawerText":"Hide","expandDescriptionText":"More +","collapseDescriptionText":"Less -","ariaLiveLabelFormat":"Showing {0} through {1} of {2}","scrollLeftButtonLabel":"Scroll Left","scrollRightButtonLabel":"Scroll Right","includeScrollIndicator":true},"primaryAttributes":[{"label":"Prep Time","values":[{"text":"15","label":"min"}]},{"label":"Total","values":[{"text":"55","label":"min"}]},{"label":"Servings","values":[{"text":"4"}]},{"label":"Ingredients","values":[{"text":"8"}]}],"secondaryAttributes":[],"badges":[{"badgeType":3,"badgeText":"","label":"kitchen tested","imageUrl":"/-/media/GMI/Core-Sites/BC/Images/Shared/RecipeParts/KitchenTested_BC1_new.jpg?sc_lang=en","linkUrl":"/about-us/kitchen-tested","metaDataTags":[],"showMemberInfo":false,"matchedMetadataId":"00000000-0000-0000-0000-000000000000"}],"backgroundImageUrl":"/-/media/GMI/Core-Sites/BC/Images/Shared/RecipeParts/img-bc-rdp-heroDotPattern.png?sc_lang=en","breadcrumbs":{"links":[{"url":"/","label":"Home"},{"url":"/recipes","label":"Recipes"}],"currentPageName":"Stuffed Peppers"}};
var moduleName = 'recipeFaq';
var isVueModule = true;
GeneralMills.PandoSites.RegisterControlInstance(moduleName, configuration, componentMetadata, isVueModule)
});
})();